Week 6: Locking Safe
My goal for this project was to create a locking safe. The safe would be locked and would only unlock if the correct code is put into the safe. I also wanted to include a Master/Override code that would allow a consumer to set their own Access Code for the Safe. Here is my Video of the Safe Working.


Here's my Wiring Diagram:

This Safe took a bunch of coding and I really enjoyed the challenge. The past six years all of my coding challenges have been in the role of teaching students, and after awhile their codes become rudimentary and repetitive. Even my most advanced students only scratch the surface with the robotics that we do in my classes. (As a side note, next Spring (2019) I have been given the green light to teach a whole coding class to my students. I am quite excited to expand our exposure with computer programming). Below is a video of me walking through the code.
Now that you've seen the final products. Here is the journey of how I got there. First I wanted to do a completely different project involving the Stepper Motor, which would spin continuously. I tried for hours to get the motor to even turn on, but to no avail. After I tested the circuit with an LED (video below) I gave up and decided to only use the Servo.
Once I resolved to only use the Servo Motor I created the sample code and circuit and saw that the Servo moves to a specific angle and then stays there. At some point the idea of a Safe popped into my head and then I was off to the races. I started with some pictures of where I wanted to go. I wrote out my goals as well as where I wanted each function and subfunction to redirect (though I ended up using many more functions than I originally planned for).

Next I identified what pins I wanted each device to be hooked to.

Finally, I drew a large version of the potentiometer. Indicating how far it could spin in either direction. I wrote 0-9 at the different angles they correspond to. The bottom indicates the ranges for each of these numbers (i.e. 0-102 should translate to 0, 103-204 should translate to 1, etc.).

My next step would be to put a small piece of paper with these numbers on my actual board. That way you could utilize the potentiometer without looking at the screen.
The bulk of the work followed pretty much the same pattern. Create a new section of code, put a few Serial.print functions to see that the code was working and getting to the correct areas at the correct time. The picture below shows a number of these functions and I would check the debugger window to see if the correct words were displayed.

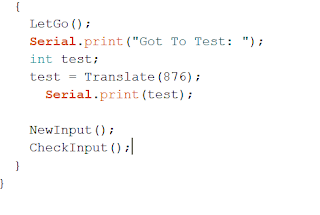
This code also prompted me to expand my use of functions. Up to this point I have only used VOID functions. This was a challenge for my Translate function because I needed it to accept a number (from the potentiometer) and produce a new number (on the 0-9 scale). This website helped me create this type of function that can accept input values and produce output values. After I created this translate function I wanted to test it and did so with the following code. On the Debugger window it should indicate "Go to Test: " at the beginning of the function and then translate the number. In this case I input the number 876, which correlates to about 4/5 (876/1023) turn around the Potentiomter and it should translate to an 8.
Once that Translate function was working I wanted to see it in action. I hooked up the Potentiomter and began spinning it to see if the Translate produced results from 0-9 corresponding to the included pictures.
At this point the code was pretty much able to work. I finished the sections to that stored these values and checked them against the correct access codes and to turn on the RGB LED. All of that happened without much difficulty. The final step was to connect the servo motor, which thankfully was not too difficult. There were a couple of new lines of code utilized to control the servo, but I just copied the general form from the example.
Trouble! Once I hooked up the Servo the potentiometer Read function (that displays the numbers to the screen) kept bugging out. I would turn it to '2' and it kept flashing between 1 and 2. It would do this for all numbers. See this video showing the problem:
When the servo was unplugged it worked fine, but started glitching as soon as the servo was connected. I surmised that the problem may be that the arduino does not have enough current to power both the potentiometer and the servo motor. Luckily I had purchased a 9V battery when I tried to solve the problem with my first motor. Once the 9V was connected both components functioned properly.
Here's my Wiring Diagram:

Here is my Code: (About 250 lines)
/* Travis Ray
* Makerspaces Final Project
* Mechanical Safe with lock
*
* Task Description:
* Servo motor will lock a case protecting valuables.
* It will open only when the turn dial potentiometer is used to select the correct values.
*
* Pseudocode
* Potentiometer reads value to printscreen, press button to save value (repeat for four numbers)
* This stored value is checked against the correct value and then does one of the following:
* 1-Correct value: LED turns green, Servo moves to OPen
* 2-Wrong Value: LED turns red, prints wrong passcode
* 3-Override/Master value: LED turns blue, asks for new correct code
*
*
*/
#include <Servo.h> // servo library
Servo MyServo; //Create a Servo called MyServo
int Locked = 0;
int Opened = 70;
int MyCode[] = {0,0,0,0}; //Starting Entered Code
int YesCode[] = {1,2,3,4}; //Starting Open Code
const int MasterCode[] = {9,8,9,2}; //Override MASTER Code
const int ServoPin = 11; //Servo connect to dig 11
const int LEDR = 10; //LED R connect to dig 10
const int LEDG = 9; //LED G connect to dig 9
const int LEDB = 8; //LED B connect to dig 8
const int PotPin = 0; //Analog 0
const int Button1 = 2; // Button conn-ct to dig 2
int mydelay = 100;
void setup()
{
MyServo.attach(11);
pinMode(LEDR, OUTPUT);
pinMode(LEDG, OUTPUT);
pinMode(LEDB, OUTPUT);
pinMode(Button1, INPUT);
Serial.begin(9600); //Debugging Tool
}
void loop()
{
MyServo.write(Locked);
int buttonValue;
buttonValue = digitalRead(Button1);
if (buttonValue == LOW)
{
LetGo();
NewInput();
CheckInput();
}
}
//Add a new function for Pick number that does all of this and returns the selected number
//Make NewInput empty and have it loop four times, altering each part of array
void NewInput()
{
int EnteredValue;
int i;
for (i = 0; i <= 3; i++)
{
EnteredValue = GetNumber();
MyCode[i] = EnteredValue;
}
//Displays the 4 digit pin that was entered
Serial.print("You Entered the Code: ");
Serial.print(MyCode[0]);
Serial.print(MyCode[1]);
Serial.print(MyCode[2]);
Serial.print(MyCode[3]);
}
void CheckInput()
{
//Checks to see if the entered code matches the Master Code
if(MyCode[0] == MasterCode[0] && MyCode[1] == MasterCode[1] && MyCode[2] == MasterCode[2] && MyCode[3] == MasterCode[3])
{
digitalWrite(LEDB, HIGH);
Serial.println();
Serial.print("You Have Entered Master Mode. Please Input The New Code. ");
Serial.println();
Master_Reset();
Serial.println();
Serial.print("Press Button to Save");
Serial.println();
}
//Checks to see if the entered code matches the Yes Code to Open Safe
else if(MyCode[0] == YesCode[0] && MyCode[1] == YesCode[1] && MyCode[2]==YesCode[2] && MyCode[3] == YesCode[3])
{
//Open Servo
digitalWrite(LEDG, HIGH);
MyServo.write(Opened);
Serial.println();
Serial.print("Correct PIN. Safe Open. Press Button to Secure Safe.");
Serial.println();
}
//If password is not recognized
else
{
digitalWrite(LEDR, HIGH);
Serial.println();
Serial.print("Wrong PIN. Press Button to Try Again.");
Serial.println();
}
int buttonValue;
buttonValue = digitalRead(Button1);
while(buttonValue == HIGH)
{
buttonValue = digitalRead(Button1); //Checks button current value
delay(50);
}
LetGo();
MyServo.write(Locked);
digitalWrite(LEDR, LOW);
digitalWrite(LEDG, LOW);
digitalWrite(LEDB, LOW);
//Servo intput
}
void Master_Reset()
{
int EnteredValue;
int i;
for (i = 0; i <= 3; i++)
{
EnteredValue = GetNumber();
YesCode[i] = EnteredValue;
}
//Displays the 4 digit pin that was entered
Serial.print("The Code Has Been Changed To: ");
Serial.print(YesCode[0]);
Serial.print(YesCode[1]);
Serial.print(YesCode[2]);
Serial.print(YesCode[3]);
}
//Uses button and potentiometer to enter values into safe
int GetNumber()
{
//Sets all variables for function
int PotValue = analogRead(PotPin); //Gets value from potentio
int buttonValue = digitalRead(Button1); //Is button pressed?
int StoredValue = Translate(PotValue); //Stored value used for comparison
int CurrentValue; //Current Value
int difference = StoredValue - PotValue; //Diff between temp and current value
Serial.print("Press Button When Finished. Your Current Value is: ");
Serial.print(StoredValue);
Serial.print("\t");
while(buttonValue == HIGH) //Repeats until you press the button
{
buttonValue = digitalRead(Button1); //Checks button current value
PotValue = analogRead(PotPin); //Checks potentiometer current value
CurrentValue = Translate(PotValue); //Translates pot value to 0-9 scale
difference = StoredValue - CurrentValue; //Checks to see if current value on safe has changed
if(abs(difference) > 0) //If the value on safe has changed
{
StoredValue = CurrentValue; //Update stored value
Serial.print(StoredValue); //Display new number
Serial.print("\t");
delay(1000);
}
}
LetGo(); //Wait for user to let go of button
Serial.println();
return StoredValue; //Returns the current value on safe
}
//Function that pauses program until you let go of the button, preventing quick looping
void LetGo()
{
int buttonValue;
buttonValue = digitalRead(Button1);
while(buttonValue == LOW) //Waits until you let go of button
{
buttonValue = digitalRead(Button1);
delay(mydelay);
}
}
//Translates Raw values (0-1023) into 0-9 Scale
int Translate(int Raw)
{
int result;
if(Raw <102)
{
result = 0;
}
else if(Raw < 204)
{
result = 1;
}
else if(Raw < 306)
{
result = 2;
}
else if(Raw < 408)
{
result = 3;
}
else if(Raw < 510)
{
result = 4;
}
else if(Raw < 612)
{
result = 5;
}
else if(Raw < 714)
{
result = 6;
}
else if(Raw < 816)
{
result = 7;
}
else if(Raw < 918)
{
result = 8;
}
else
{
result = 9;
}
return result;
}

Congratulations on getting to teach your own coding class, it has been very obvious you are very knowledgeable in this area. Your posts have helped many of us as we flounder through this course.
ReplyDeleteI loved your final project of getting your circuit to open your little safe. With all the components there would be no way I could even come close to this. Great work and thanks again for all your help through out this course.